프론트엔드/REACT
리액트 네이티브로 하단바 만들기 - 웹뷰 버전
인천쓰
2024. 1. 16. 10:07
반응형
리액트 네이티브의 웹뷰로 업로드하기에앞서 그래도 네이티브를 맛보기위해
하단바는 네이티브스럽게 버튼으로 url 을 이동하는게아닌 웹뷰를 이동할수있게 하는 CreateBottomTabNavigator를 사용해보도록 하겠다 . 탭이라는 개념은 리액트에선 다뤄보지못햇던 것이라 처음 사용해보았는대
네이티브안에서의 탭은 컴포넌트의 스크린을 비춰준다의 의미가 강한것 같았다 .
그리고 나는 expo/vecor-icons 라는 아이콘을 사용하여 간단한 하단바를 만들어 탭으로 웹뷰를 이동하는 코드를 만들어보았다
export default function MyTabs() {
return (
<Tab.Navigator
initialRouteName="Home"
screenOptions={{
tabBarStyle: styles.tabBarStyle,
tabBarActiveTintColor: "#F95001", // 텍스트 색상을 변경하는 옵션
tabBarHideOnKeyboard: true,
}}
>
<Tab.Screen
name="일정"
component={Diary}
options={{
headerShown: false,
tabBarIcon: ({ color, size }) => (
<Entypo name={"calendar"} color={color} size={size} />
),
}}
/>
<Tab.Screen
name="도감"
component={Book}
options={{
headerShown: false,
tabBarIcon: ({ color, size }) => (
<Feather name={"book"} color={color} size={size} />
),
}}
/>
<Tab.Screen
name="HOME"
component={HomeMenu}
options={{
headerShown: false,
tabBarIcon: ({ color, size }) => (
<MaterialCommunityIcons
name={"home-circle"}
color={color}
size={size}
/>
),
}}
/>
<Tab.Screen
name="구독"
component={Quick}
options={{
headerShown: false,
tabBarIcon: ({ color, size }) => (
<FontAwesome5 name={"shopping-basket"} color={color} size={size} />
),
}}
/>
<Tab.Screen
name="MAP"
component={Map}
options={{
headerShown: false,
tabBarIcon: ({ color, size }) => (
<Entypo name={"map"} color={color} size={size} />
),
}}
/>
</Tab.Navigator>
);
}
헤더는 웹뷰내에 미디어쿼리사용으로 사용하지않고 하단바로만 사용하였습니다 .고로 headerShown :false
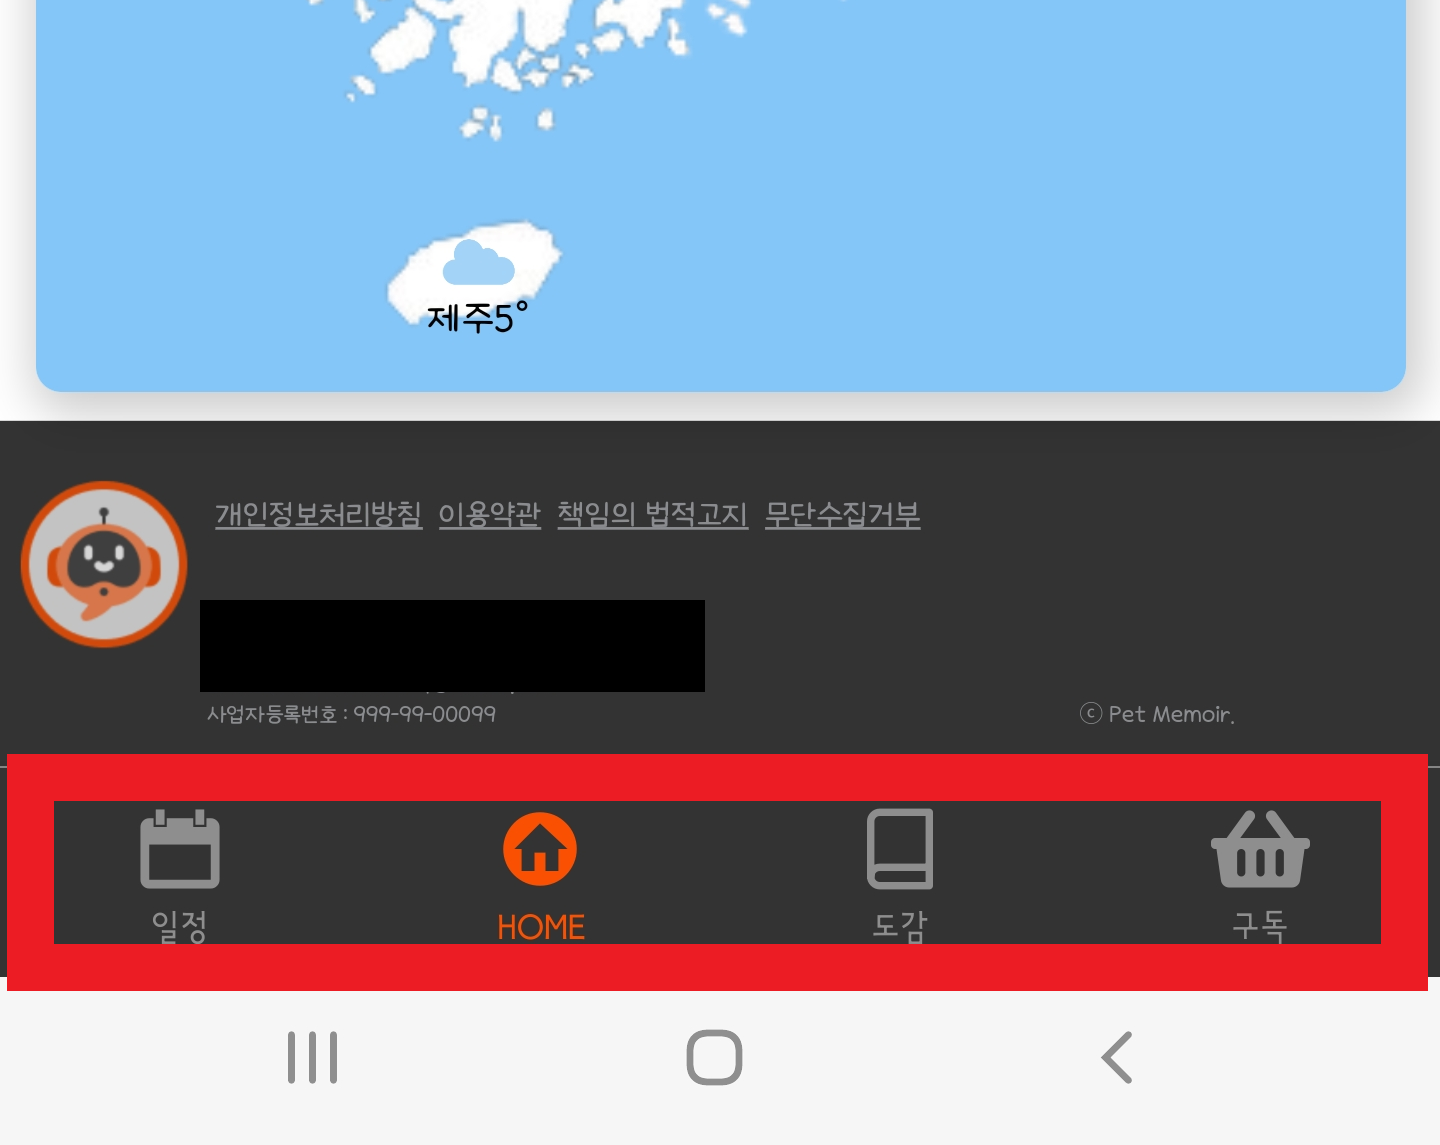
이로서 하단바 제작이 완료되었습니다 .
웹뷰 컴포넌트도 추가적으로 하나정도는 올려보겠습니다 .
function Diary({ navigation }) {
const webViewRef = useContext(WebViewContext);
const [loading, setLoading] = useState(true);
const [key, setKey] = useState(0);
useEffect(() => {
async function requestLocationPermission() {
try {
let { status } = await Location.requestForegroundPermissionsAsync();
if (status === "granted") {
console.log("Location permission granted");
reloadWebView();
setLoading(false);
} else {
console.log("Location permission denied");
}
} catch (error) {
console.error("Error requesting location permission:", error);
}
}
requestLocationPermission();
}, []);
const reloadWebView = () => {
// key 값을 변경하여 WebView를 리랜더링하도록 유도
setKey((prevKey) => prevKey + 1);
};
useFocusEffect(
React.useCallback(() => {
// 화면이 포커스되었을 때만 호출되도록 수정
webViewRef.current.injectJavaScript(`location.href=${HOME_URL}`);
reloadWebView();
}, [webViewRef])
);
function LoadAnimation() {
return <Spinner visible={loading} />;
}
return (
<SafeAreaView style={styles.container}>
<WebView
key={key}
ref={webViewRef}
onLoad={() => setLoading(false)}
source={{ uri: HOME_URL + "diy" }}
javaScriptEnabled={true}
domStorageEnabled={true}
geolocationEnabled={true}
mixedContentMode="always"
/>
{loading && <LoadAnimation loading={loading} />}
</SafeAreaView>
);
}
tab으로 웹뷰컴포트 이동시, 문제점이 많이 발생하였는데 로그인이 랜더링이 일어나지않는다는것과 안드로이드 위치정보 서비스가 적용이 안된다는점! 해결법으로 웹뷰마다 key값을 넣어주었으며 새로운 키값으로 바뀌게 해주었습니다 .
그리고 안드로이드 위치정보서비스는 gpt의 도움을 받아 해결받았습니다 . 비동기로 위치정보를 요청하는것 이더군요 ( ios는 정상적으로 작동합니다 ^^ )
이상 네이티브 하단바 만들기입니다 . 이제 구글콘솔에 올려볼까~
반응형